How to Edit Letters on Printable Bunting Banner
In Print Cut Hang shop you can find bunting banner templates to make a personalized party decoration. The great thing about these digital products is that you can edit them online and that you no need to buy any software for that.
Even better you can see the template before buying and you can try to edit the document by yourself.
Every digital product in my shop has a DEMO LINK. If you surfing in the Etsy shop you only have to copy-paste this link in your browser. In Print Cut Hang Store ( stand-alone website demo links are clickable and easy to find because they are red ).
The below images will quickly explain to you what can you edit and what tools you can use.
For example, I used red polka dot pennants and here is a link for this digital product.
DEMO link:
- Step 1 - Starting
On top of your web screen, you will see how many pages the document has and arrows to navigate between pages.
- Step 2 - Plan what do you want to edit
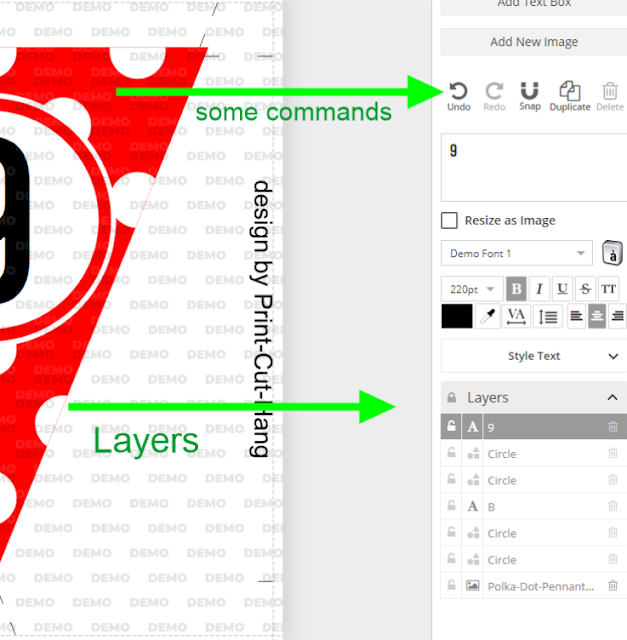
On the right side are tools and some useful commands. You can see that you can add a new image and add a new text box. Also, there are undo and redo commands, and a very useful '' duplicate '' commands.
Bellow are ''layers''. You can see how many elements the page has. In our example, there are text boxes, several circles shapes and at the bottom is the image of our main design ''polka dot pennants''.
TIPS: If you do not want to change some layers it is good to lock them. In that way, you can prevent unexpected changes when you touch the main screen.
- Step 3 - Letters Editing
You obviously want to add letters or numbers.
The easiest way is to write in the box under commands. In our example, we have a number 9. In the box, you can erase the number 9 and write what you want. You can also change the color, by a picker tool or by color hex tool.
I like to do all the changes from right side toolboxes. In that way, I am secure that I do not move letters from the place and I do not have to align all letters and circles over again.
Tips: You can duplicate pages. When you know how many letters you need for your banner you have to decide about pennant colors. Simply duplicate pages and change letters, and colors if you want.
- Step 4 - Circles Editing
- Step 5 - make pennants with a photo
Your image will be on top of all layers. You have to move the image under the ''polka dot pennant'' layer. If your image is too big or too small click on the corner to resize it.
And that is that. This is the DEMO. You can not save and download. This is just an example of a template and template editing possibilities. To save the edited banner you need to purchase it. In the purchased version you will not see DEMO pattern overlay. By purchasing the listing you will see a clear design. You will be able to save the design in any step you are and come back later to finish. When you are satisfied with editing you can download the file ( PNG, JPG or PDF) for printing.
Hope that little explanation will help you.
Here you can find a red polka dot banner - the site is powered by Etsy and the transaction is secure.
Want to know when the next post will be published?


Great tutorial!
ReplyDeleteawesome tutorial! thanks :)
ReplyDeleteRead more I have read all the comments and suggestions posted by the visitors for this article are very fine,We will wait for your next article so only.Thanks!
ReplyDelete